User Management
Managing users in the MyLightedge Portal is simple and conveniently found within the Accounts side of the Portal. The only default roles that can manage users are the Organization Admin Role and the Organization Admin - Without Billing Role. You can create custom roles that may also have the permissions to manage users.
Adding Portal users
Portal users are users who can login to the MyLightedge Portal. They can be added by an Admin from your company or by Lightedge. To add a Portal user navigate to the “Accounts & Settings” menu option and select “People”. This will open a new tab all centered around user management and take you to the Team members page. At the bottom of the page is a button called “Add Team Members”.
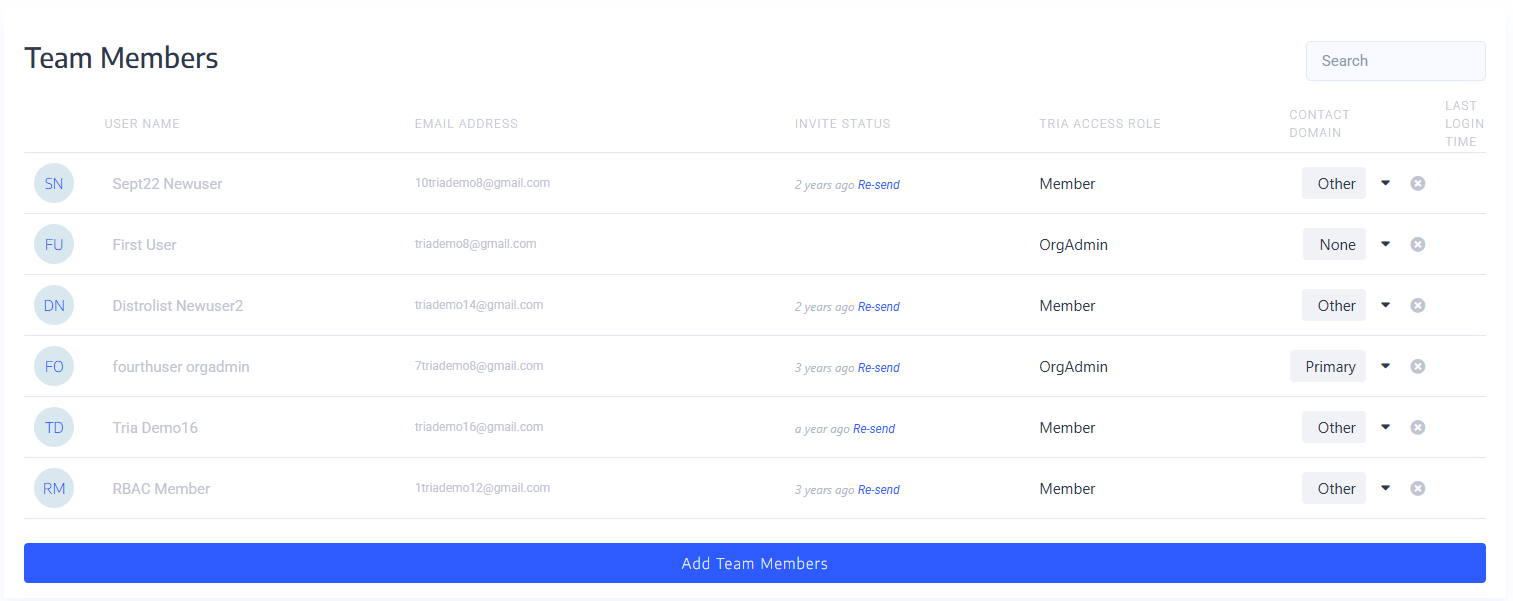
You will then be taken to the Add a Team Member page. From here it will be on the page for adding a Portal user. Please provide all of the fields listed and then hit “Add Team Member”. Within this form Roles represent the level of Portal access you are granting to the user being added. Contact Domain(s) represent the expertise at your company that this user being added has.
Once you have added the new Portal user they will receive an email that will walk them through the onboarding steps to get setup in the MyLightedge Portal.
Note
If you would like Lightedge to assist you in adding new Portal users then please create a ticket requesting that new Portal users get created. Please include the users first name, last name, email, their area of expertise at your company (Primary, Technical, Billing, Emergency, Other, Secondary, Networking, KeyStakeholder), and which default role or custom role you would like for them to have.
Adding Non-Portal users
Non-Portal users are users who can not login to the MyLightedge Portal but who can and may need to be contacted by MyLightedge or have other permissions such as Physical Data Center Access, etc. They can be added by an Admin from your company or by Lightedge. To add a Non-Portal user navigate to the “Accounts & Settings” menu option and select “People”. This will open a new tab all centered around user management and take you to the Team members page. At the bottom of the page is a button called “Add Team Members”.
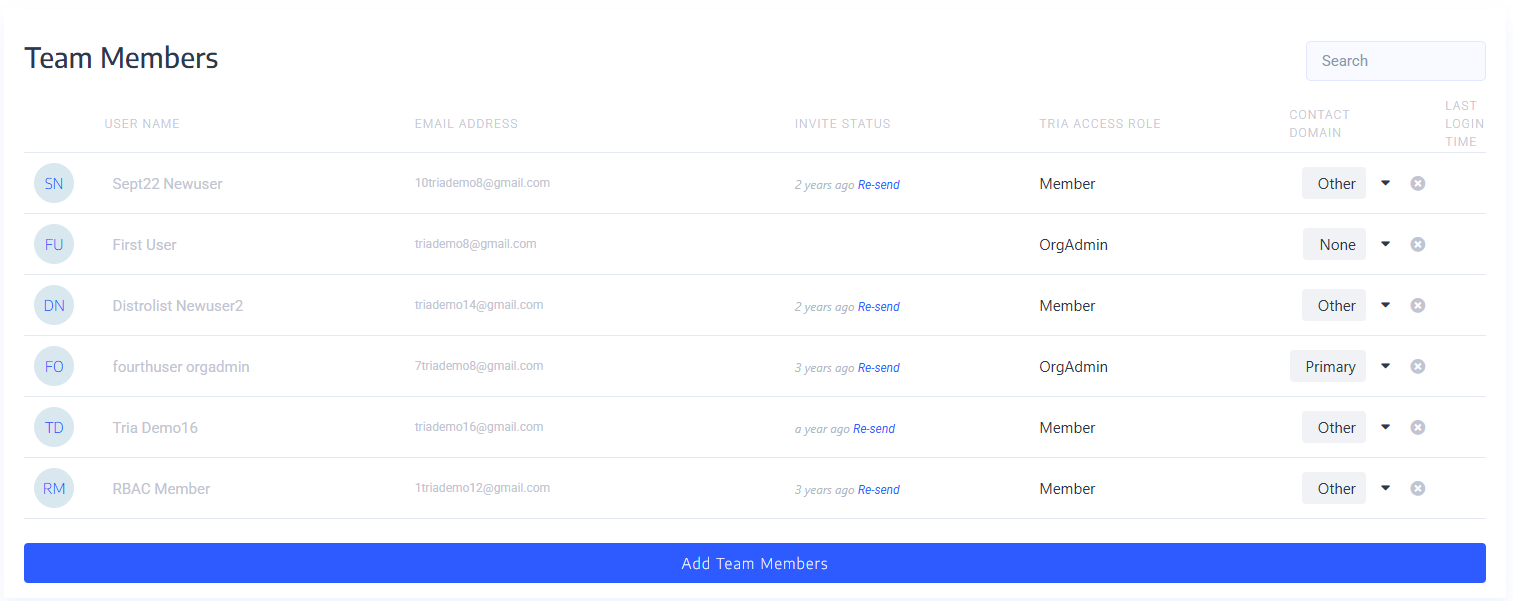
You will then be taken to the Add a Team Member page. From here it will be on the page for adding a Portal user. Please check the box saying, “Add a user with “No Mylightedge Portal Access”. Then provide all of the fields listed and finally hit “Add Team Member”.
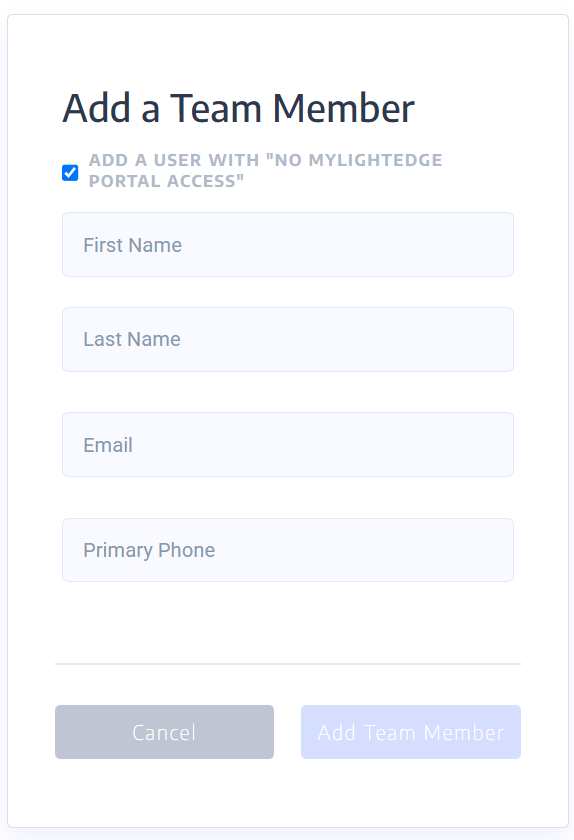
Once added you will be able to view this user within the Team Members page at the bottom labeled as a Login Not Supported user.
Note
You can always update a Non-Portal user and make them a Portal user from the Team members page and clicking “Add Team Member” on the row with their name and email.
Changing a user’s Permissions
Steps to create a new role and assign it to a new user
Creating a New Role
Login to the MyLightedge Portal and navigate to the Accounts – Profile to get MyLightedge Accounts
Within MyLightedge Accounts, navigate to Accounts – RBAC
Hit “Create New Role”
Type in a Role Name – this will be displayed first when selecting a role
Type in a Role Description – this will be shown beside the name to better describe the role
Within Access Permissions toggle on the desired functionality for the role you are creating
When done hit “Save Role”
Assigning a Role to a User
Login to the MyLightedge Portal and navigate to the Accounts – Profile to get MyLightedge Accounts
Within MyLightedge Accounts, navigate to Accounts – People
Click on the “Add Team Members” button on the bottom of the page
Fill in all the information requested and under Select a Role, pick the role you just created for the user
When done hit “Add Team Member”
Steps to create a new role and assign it to an existing user
Creating a New Role
Login to the MyLightedge Portal and navigate to the Accounts – Profile to get MyLightedge Accounts
Within MyLightedge Accounts, navigate to Accounts – RBAC
Hit “Create New Role”
Type in a Role Name – this will be displayed first when selecting a role
Type in a Role Description – this will be shown beside the name to better describe the role
Within Access Permissions toggle on the desired functionality for the role you are creating
When done hit “Save Role”
Assigning a Role to an Existing User
Login to the MyLightedge Portal and navigate to the Accounts – Profile to get MyLightedge Accounts
Within MyLightedge Accounts, navigate to Accounts – People
Find the name of the user whose role you want to change, you can use the search for this if needed
On the row for that user leverage the drop down for the “Mylightedge Access Role” and click on the role you wish for this user to have
Creating a new custom Role
There are currently six default roles in the MyLightedge Portal but custom roles can be created as needed as well if the current default roles don’t meet your needs. Custom Roles can be added by an Admin from your company or by Lightedge. To add a Custom Role navigate to the “Accounts & Settings” menu option and select “People”. This will open a new tab all centered around user management and take you to the Team members page. From here open the left hand menu once more and select “Accounts” then “RBAC”. You will then be taken to the People Manage Access Control page where you can click on the “+ Create New Role” button in the top right hand corner.
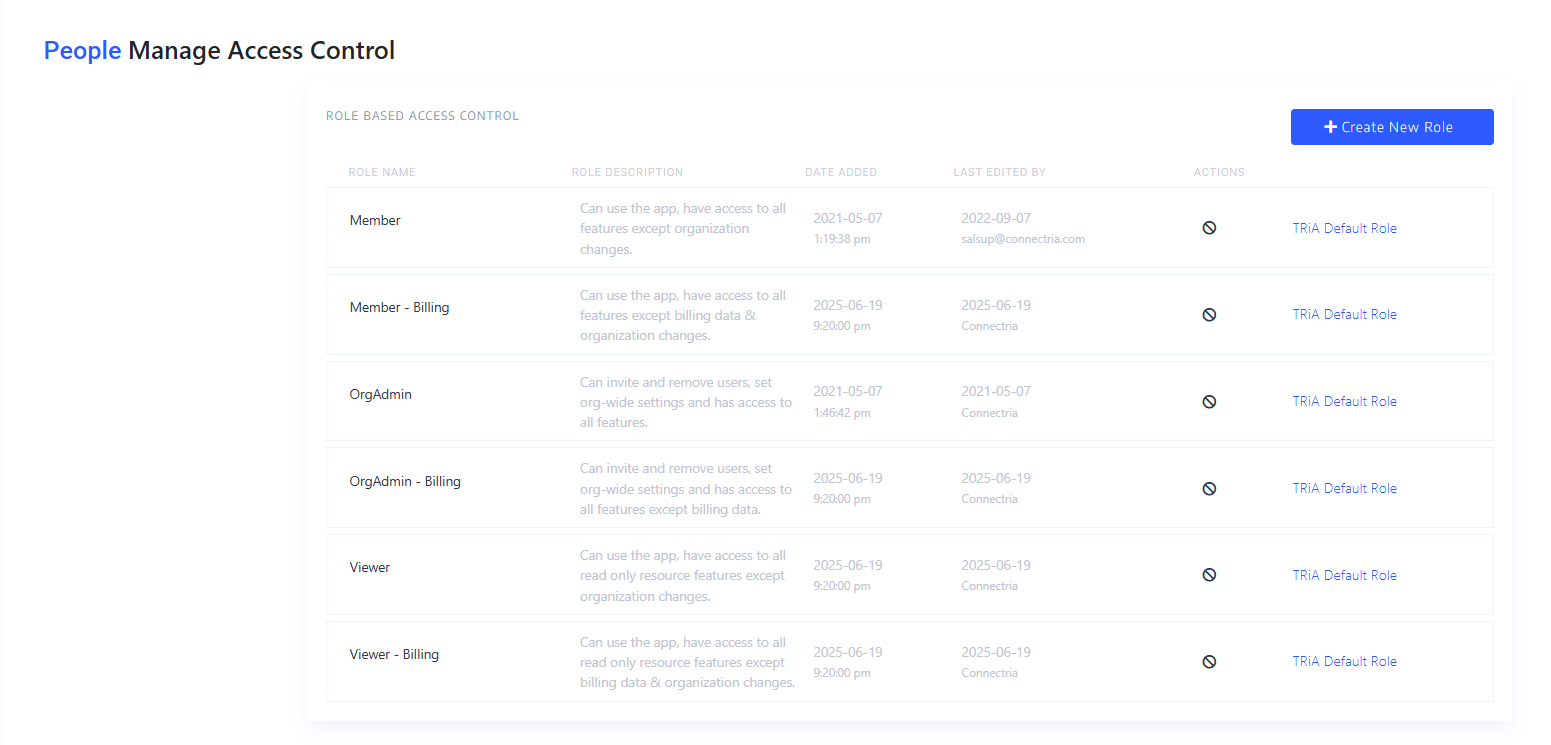
A lower section called Role Details will appear and this is where you can create the custom role. You will need to provide a Role Name, Role Description, and select at least one Access Permission by clicking on the toggle next to the permission you want to have included in this role. Once you have all the Access Permissions turned on that you want accessible for this role, then at the bottom of the page click “+ Save Role”. This will add the custom role to your organization’s list of roles. This will now be available to add to any Portal users within your organization that already exist as well as any Portal users who need to get added.
Note
You can edit any custom role by clicking on the role from within the People Manage Access Control page in Accounts and then making changes to the role within the Roles Details section at the bottom of the page and then clicking the “+ Update Role” bottom in the bottom right hand corner of the page.
Removing a Portal user
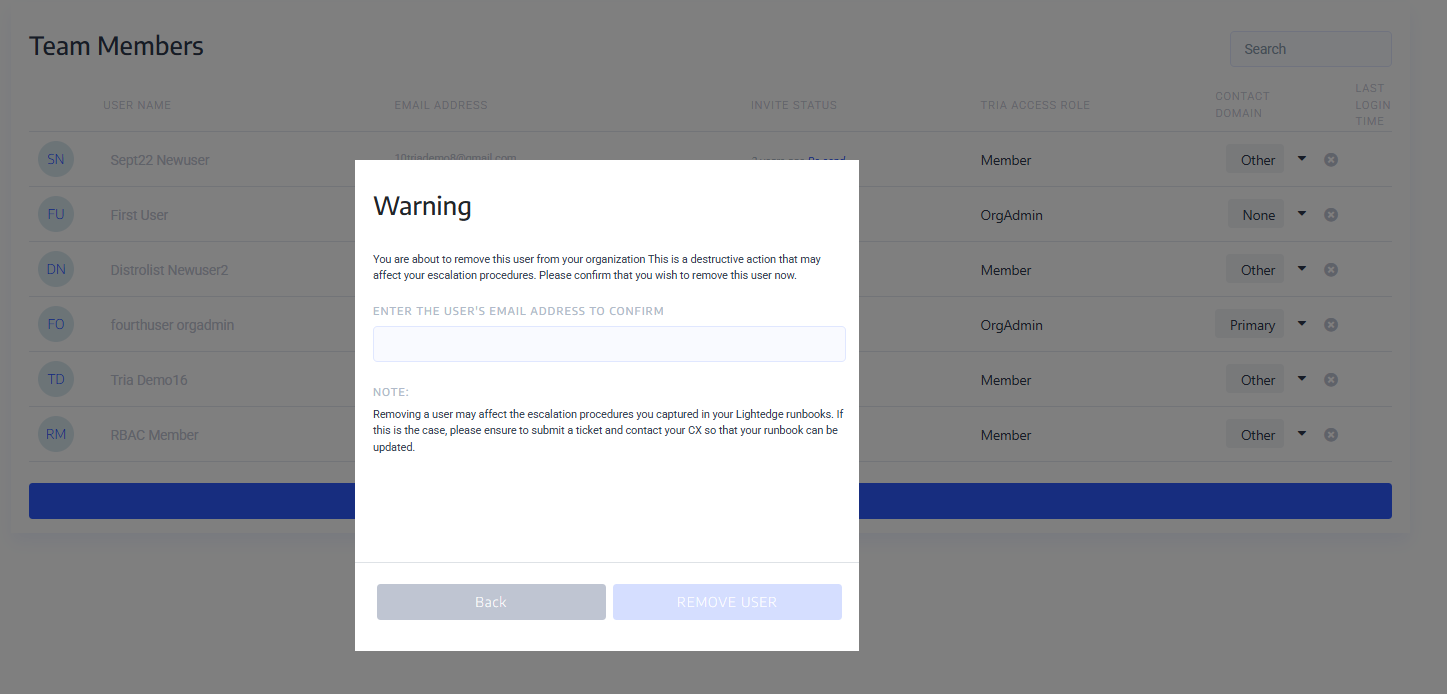
An Admin from your company or Lightedge can remove a Portal user on your behalf. To remove a Portal user navigate to the “Accounts & Settings” menu option and select “People”. This will open a new tab all centered around user management and take you to the Team Members page. From here you can use the search if needed to find the Portal user needing to be removed. Once you see the Portal user you would like to remove, click on the “X” at the right side of the row of that user and a confirmation prompt will appear. In the prompt you will need to type the email of the Portal user you want to remove then click “Remove User”.
Default Roles
There are six different default roles inside of the MyLightedge Portal. These roles exist and can be assigned to any user at any time within MyLightedge. You can also choose to create custom roles within MyLightedge using the RBAC, Role Based Access Control, section.
Organization Admin: Can invite and remove users, set org-wide settings and has access to all features.
Member: Can use the app, have access to all features except organization changes.
Organization Admin - Without Billing: Can invite and remove users, set org-wide settings and has access to all features except billing data.
Member - Without Billing: Can use the app, have access to all features except billing data & organization changes.
Viewer: Can use the app, have access to all read only resource features except organization changes.
Viewer – Without Billing: Can use the app, have access to all read only resource features except billing data & organization changes.
Permission |
MyLightedge Functionality |
Org Admin |
Org Admin - Without Billing |
Member |
Member - Without Billing |
Viewer |
Viewer - Without BIlling |
|---|---|---|---|---|---|---|---|
View Audit Log |
View Audit Log |
Included |
Included |
||||
View Connectria Billing |
View Connectria Billing |
Included |
Included |
Included |
|||
View Lightedge Billing |
View Lightedge Billing |
Included |
Included |
Included |
|||
View Compliance |
|
Included |
Included |
Included |
Included |
Included |
Included |
View Alerts |
View Alerts |
Included |
Included |
Included |
Included |
Included |
Included |
Export Alerts |
|
Included |
Included |
Included |
Included |
Included |
Included |
View Organization Support Password |
|
Included |
Included |
Included |
Included |
Included |
Included |
View Team Members |
View Team Members |
Included |
Included |
Included |
Included |
Included |
Included |
Create/Modify Portal Roles |
|
Included |
Included |
||||
Expire MFA |
|
Included |
Included |
||||
Manage Team Members |
|
Included |
Included |
||||
Reset Password |
|
Included |
Included |
||||
View AWS/Azure Cloud Alarms |
|
Included |
Included |
Included |
Included |
Included |
Included |
View Backups |
View Backup Jobs |
Included |
Included |
Included |
Included |
Included |
Included |
View Cloud Monitoring |
View Cloud Monitoring |
Included |
Included |
Included |
Included |
Included |
Included |
View LPAR Resources |
|
Included |
Included |
Included |
Included |
Included |
Included |
View Managed Devices |
|
Included |
Included |
Included |
Included |
Included |
Included |
Export Managed Devices |
|
Included |
Included |
Included |
Included |
Included |
Included |
View Environment Report |
|
Included |
Included |
Included |
Included |
Included |
Included |
View Docs & Reports |
|
Included |
Included |
Included |
Included |
Included |
Included |
View Cloud/Hybrid Resources |
View Resource Management |
Included |
Included |
Included |
Included |
Included |
Included |
View Colocation/Cloud Services |
|
Included |
Included |
Included |
Included |
Included |
Included |
Export Resource Management Devices |
|
Included |
Included |
Included |
Included |
Included |
Included |
View Cloud/Hybrid Resources - Console Access |
|
Included |
Included |
Included |
Included |
||
View Anti-Malware |
View Anti-Malware |
Included |
Included |
Included |
Included |
Included |
Included |
View AWS/Azure Security |
|
Included |
Included |
Included |
Included |
Included |
Included |
View Spend |
|
Included |
Included |
Included |
Included |
Included |
Included |
View AWS Support Tickets |
View AWS Support Tickets |
Included |
Included |
Included |
Included |
Included |
Included |
View Only Tickets |
|
Included |
Included |
||||
View/Manage Tickets |
|
Included |
Included |
Included |
Included |
||
Modify Orders |
|
Included |
Included |
Included |
Included |
||
View Only Orders |
|
Included |
Included |
Included |
Included |
Included |
Included |
RBAC - Permissions
RBAC allows for different roles, based on the functionality within the MyLightedge Portal, to be setup to include or exclude MyLightedge features, and then be applied to individual users. For example, RBAC enables a MyLightedge Administrator to create a role that allows for users to view everything in the MyLightedge Portal except spend. This role can then be applied to any or all users within that Administrator’s organization. The reverse is also true in that Administrators could choose to setup a role that allows for a user to only view spend in the MyLightedge Portal. The possibilities for managing what different user’s experiences are in the MyLightedge Portal are endless. To make things simple we are also providing six standard roles by default. This will allow users to get created quickly and see/manage all the data within MyLightedge as different roles are created as needed over time.
Category |
Permission |
Other Req. Permissions |
MyLightedge View |
MyLightedge Functionality |
|---|---|---|---|---|
Accounts |
View Audit Log |
None |
Audit Log |
View Audit Log |
Billing |
View Connectria Billing |
None |
Accounts - Connectria Billing |
View Connectria Billing |
Billing |
View Lightedge Billing |
None |
Accounts - Lightedge Billing |
View Lightedge Billing |
Compliance |
View |
None |
Compliance Management |
|
Alerts |
View |
None |
Alert Explorer |
View Alerts |
Alerts |
Export Alerts |
Alerts - View |
Alerts Explorer |
|
Organizations |
View Organization Support Password |
None |
Organization Profile |
|
People |
View Team Members |
None |
Accounts - People |
View Team Members |
People |
Create/Modify Roles |
People – View Team Members |
|
|
People |
Expire MFA |
|
|
|
People |
Manage Team Members |
People – View Team Members |
|
|
People |
Reset Password |
|
|
|
Performance |
View AWS/Azure Cloud Alarms |
None |
|
|
Performance |
View Backups |
None |
Backup Jobs |
View Backup Jobs |
Performance |
View Cloud Monitoring |
None |
Cloud Monitoring |
View Cloud Monitoring |
Performance |
View LPAR Resources |
None |
IBMi LPARS |
|
Performance |
View Managed Devices |
None |
Devices |
|
Performance |
Export Devices |
Performance – View Managed Devices |
Devices |
|
Reports |
View Environment Report |
None |
Environment Report |
|
Reports |
View Docs & Reports |
None |
Docs & Reports |
|
Resources |
View Cloud/Hybrid Resources |
None |
Resource Management |
View Resource Management |
Resources |
View Colocation/Cloud Services |
None |
|
|
Resources |
Export Devices |
Resources - View Cloud/Hybrid Resources |
Resource Management |
|
Resources |
View Cloud/Hybrid Resources - Console Access |
View Cloud/Hybrid Resources |
Resource Management |
|
Security |
View Anti-Malware |
None |
Anti-Malware |
View Anti-Malware |
Security |
View AWS/Azure Security |
None |
|
|
Spend |
View |
None |
|
|
Tickets |
View AWS Support Tickets |
None |
AWS Support Tickets |
View AWS Support Tickets |
Tickets |
View Only Tickets |
None |
Support & Ticketing |
|
Tickets |
View/Manage Tickets |
None |
Support & Ticketing |
|
Orders |
Modify Orders |
None |
Orders Explorer |
|
Orders |
View Orders |
None |
Orders Explorer |
|
Company Roles
Company Roles define the customer’s relationship with Lightedge the company. (Company Roles do not determine permissions for the MyLightedge Portal - MyLighedge Portal permissions sets are configured through MYLIGHTEDGE PERMISSIONS.)
Company Roles are only configurable by users with “Org Admin” MyLightedge permissions (or equivalent), or by the Lightedge Operations team.
- Currently there are two Company Roles:
Company Admin: An Authorized Contact responsible for maintaining individual Technical Contacts and the Company’s Code Word. Company Admins can open tickets, request information about Service, request changes to Service, and modify any Company Admins. Company Admins are responsible for maintaining contact name, phone number(s) and email address(es) for each Authorized Contact.
Physical Data Center Access (PDCA): In-person access to a customer’s on-premises data center(s) managed by Lightedge.
Physical Data Center Access
To manage Physical Data Center Access (PDCA) on MyLightedge, a user must have “Org Admin” MyLightedge permissions or equivalent.
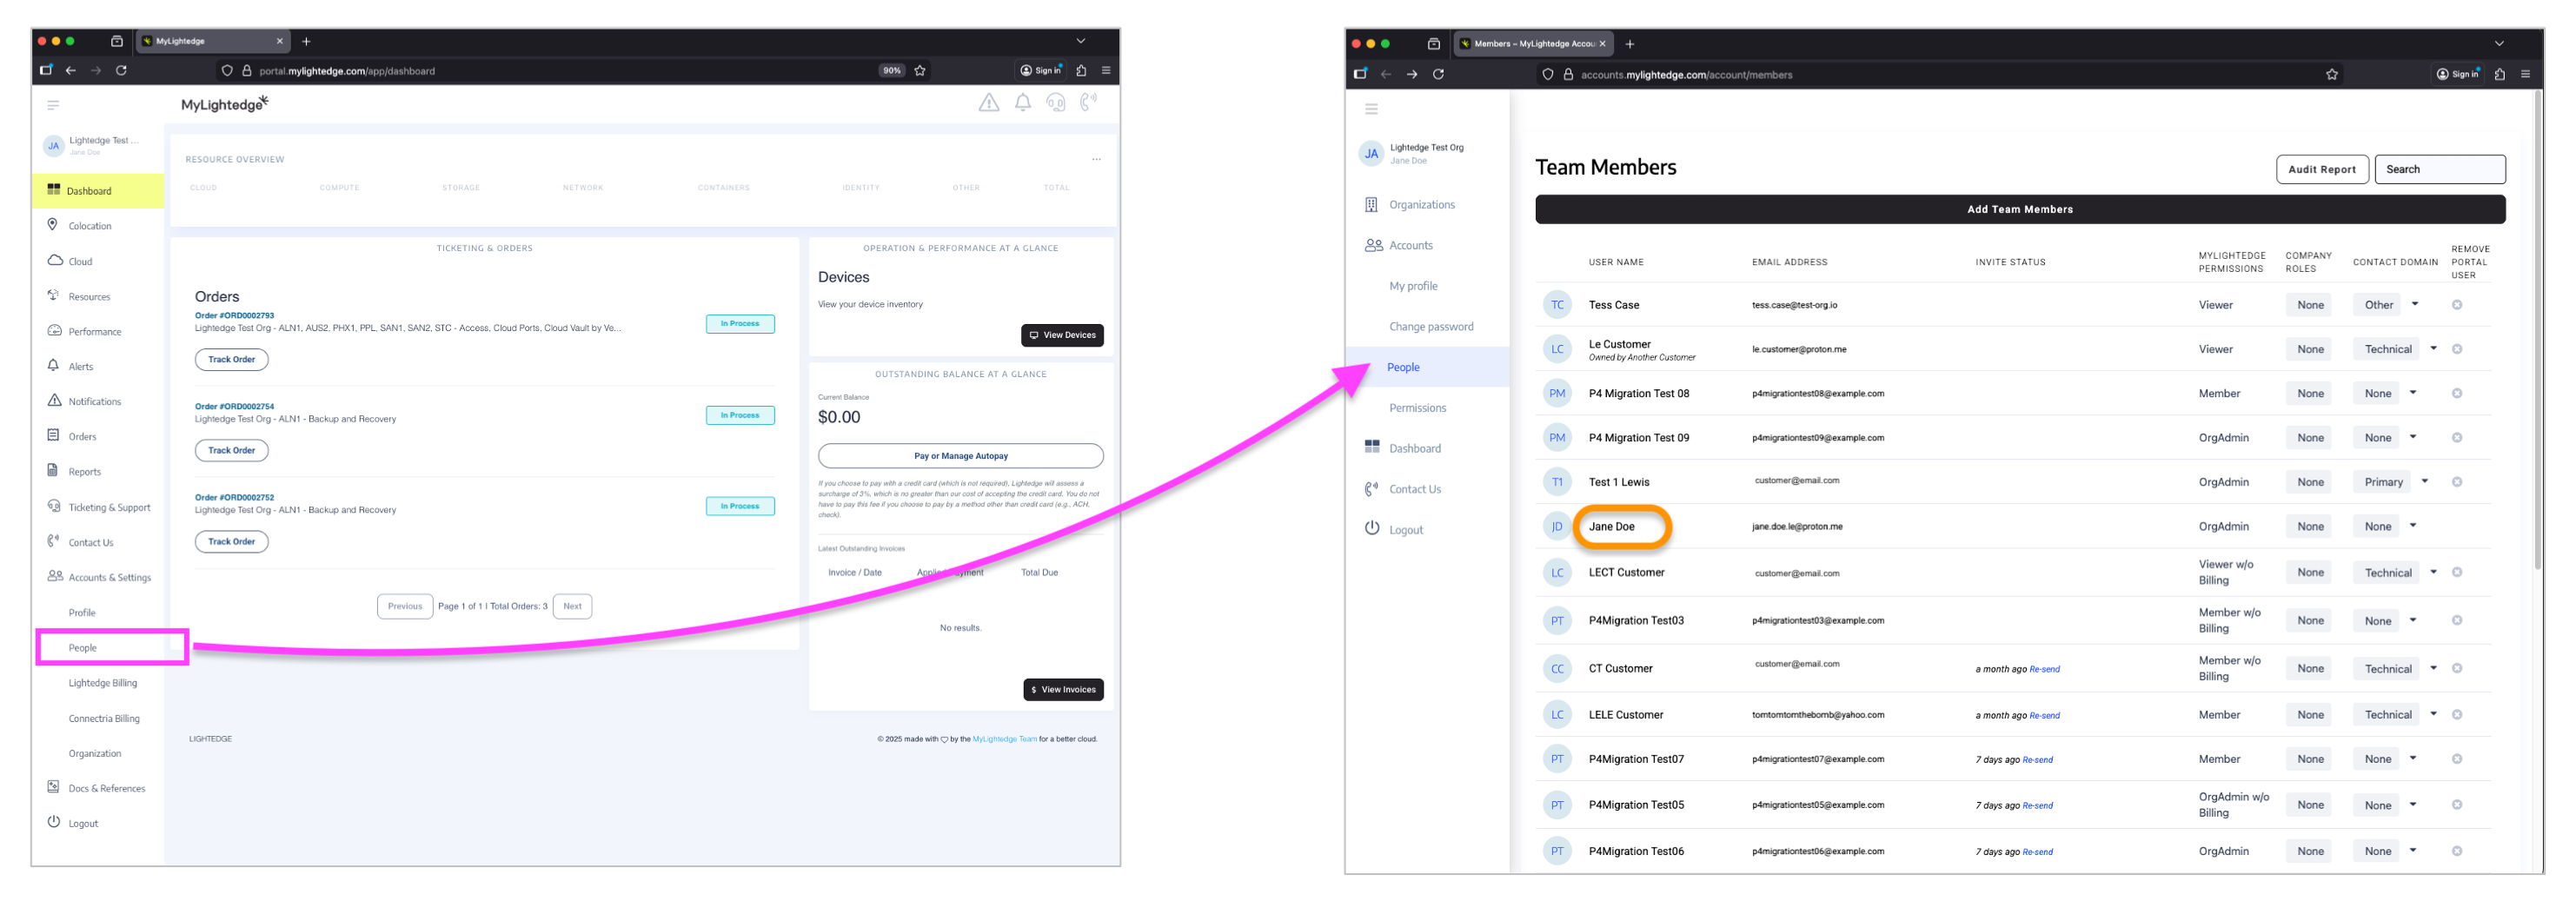
From the Dashboard, click on the ‘People’ tab under ‘Accounts and Settings’ in the left navigation bar.
Then, on the list of Team Members, click on the user name for the specific person for whom you wish to request Physical Data Center Access (PDCA).
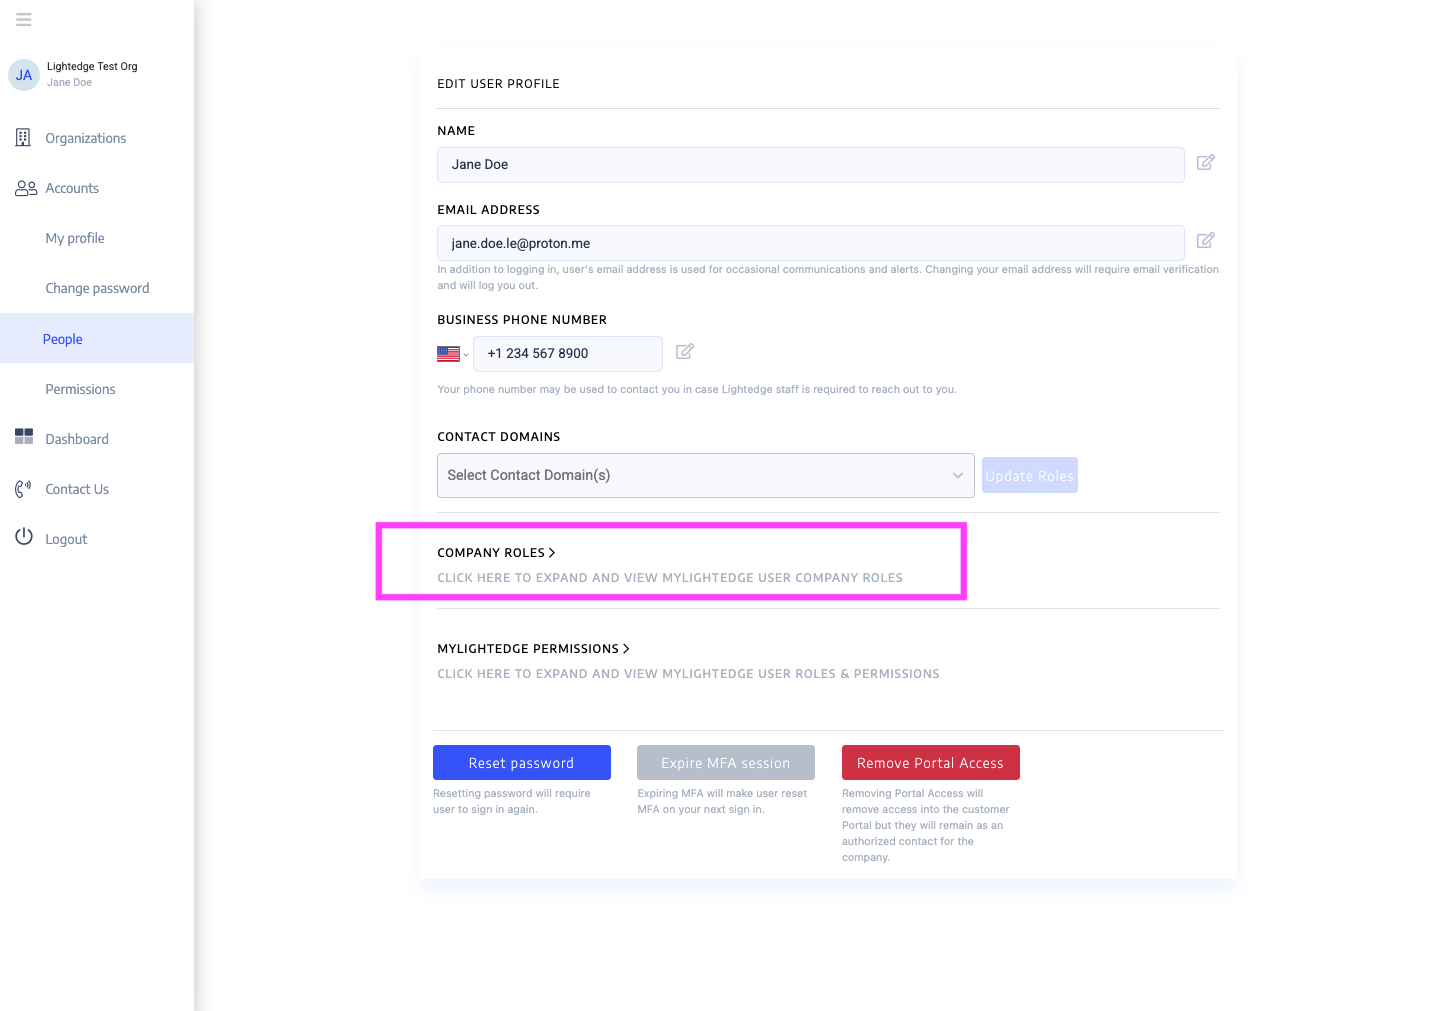
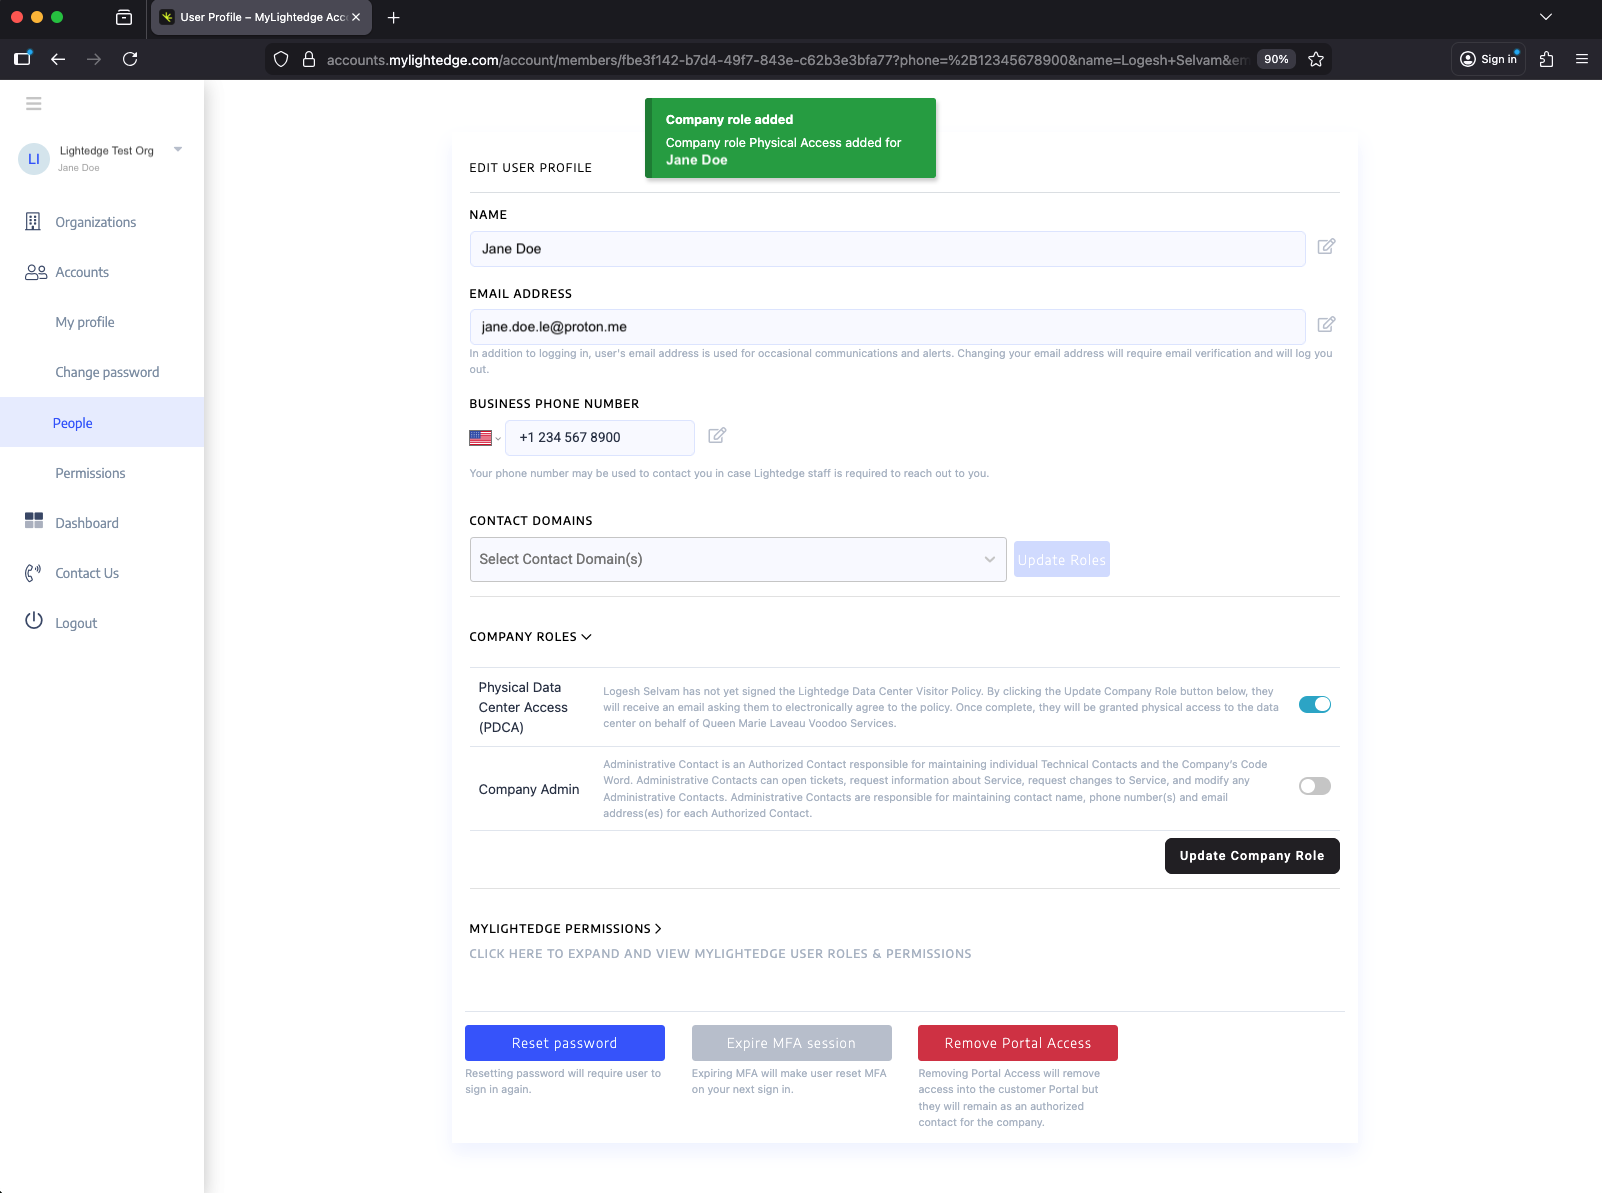
On this ‘EDIT USER PROFILE’ page, click on ‘COMPANY ROLES’ to view the selected user’s Company Roles.
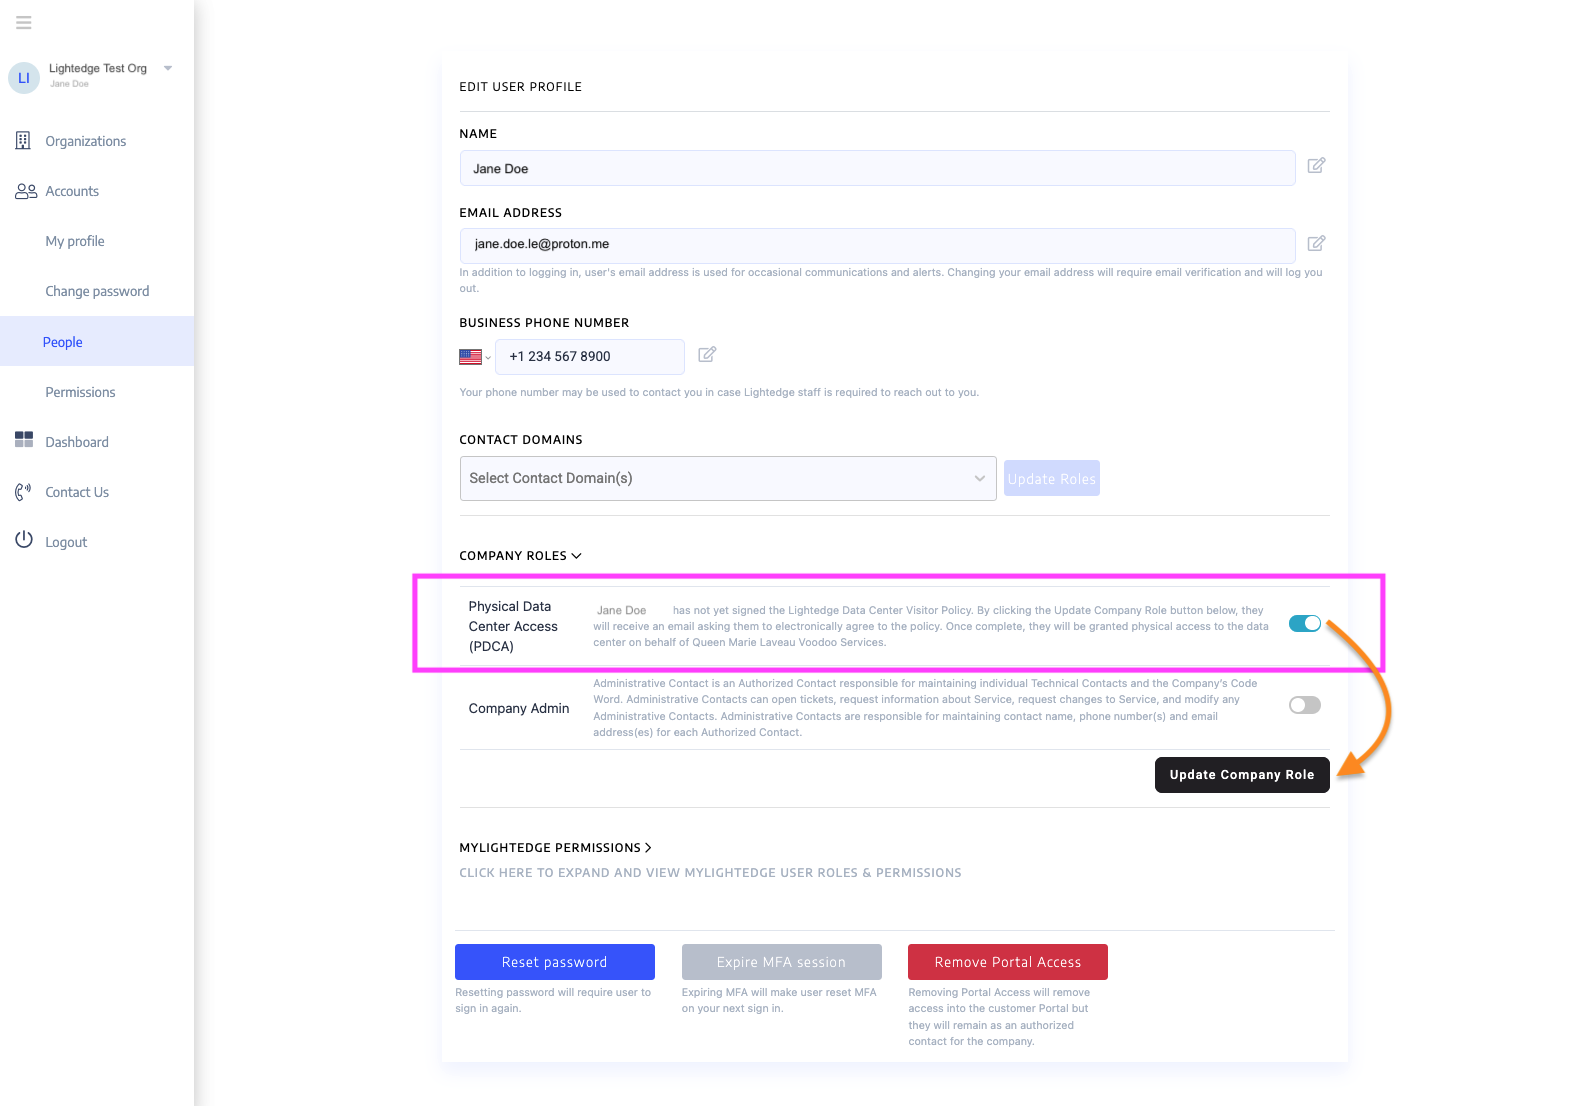
Toggle on Physical Data Center Access (PDCA) for the user and click the ‘Update Company Role’ button.
You will see a green confirmation at the top of the ‘EDIT USER PROFILE’ page. The user will receive an email asking them to electronically agree to the Lightedge Data Center Visitor Policy.
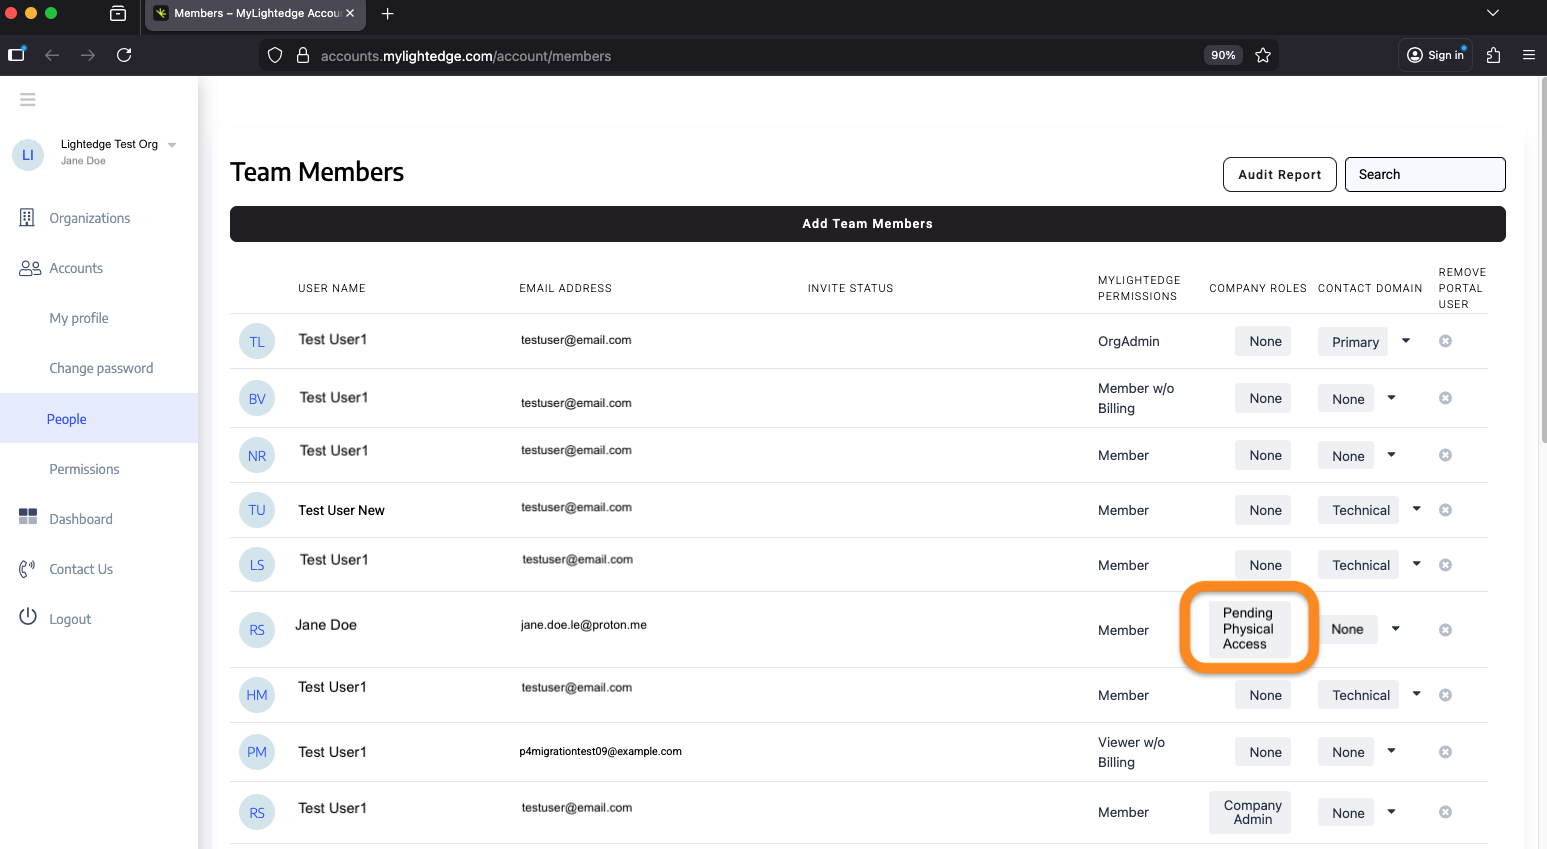
On the ‘People’ page, the updated user’s ‘COMPANY ROLE’ will show ‘Pending Physical Access’ until the user completes the aforementioned e-signing.
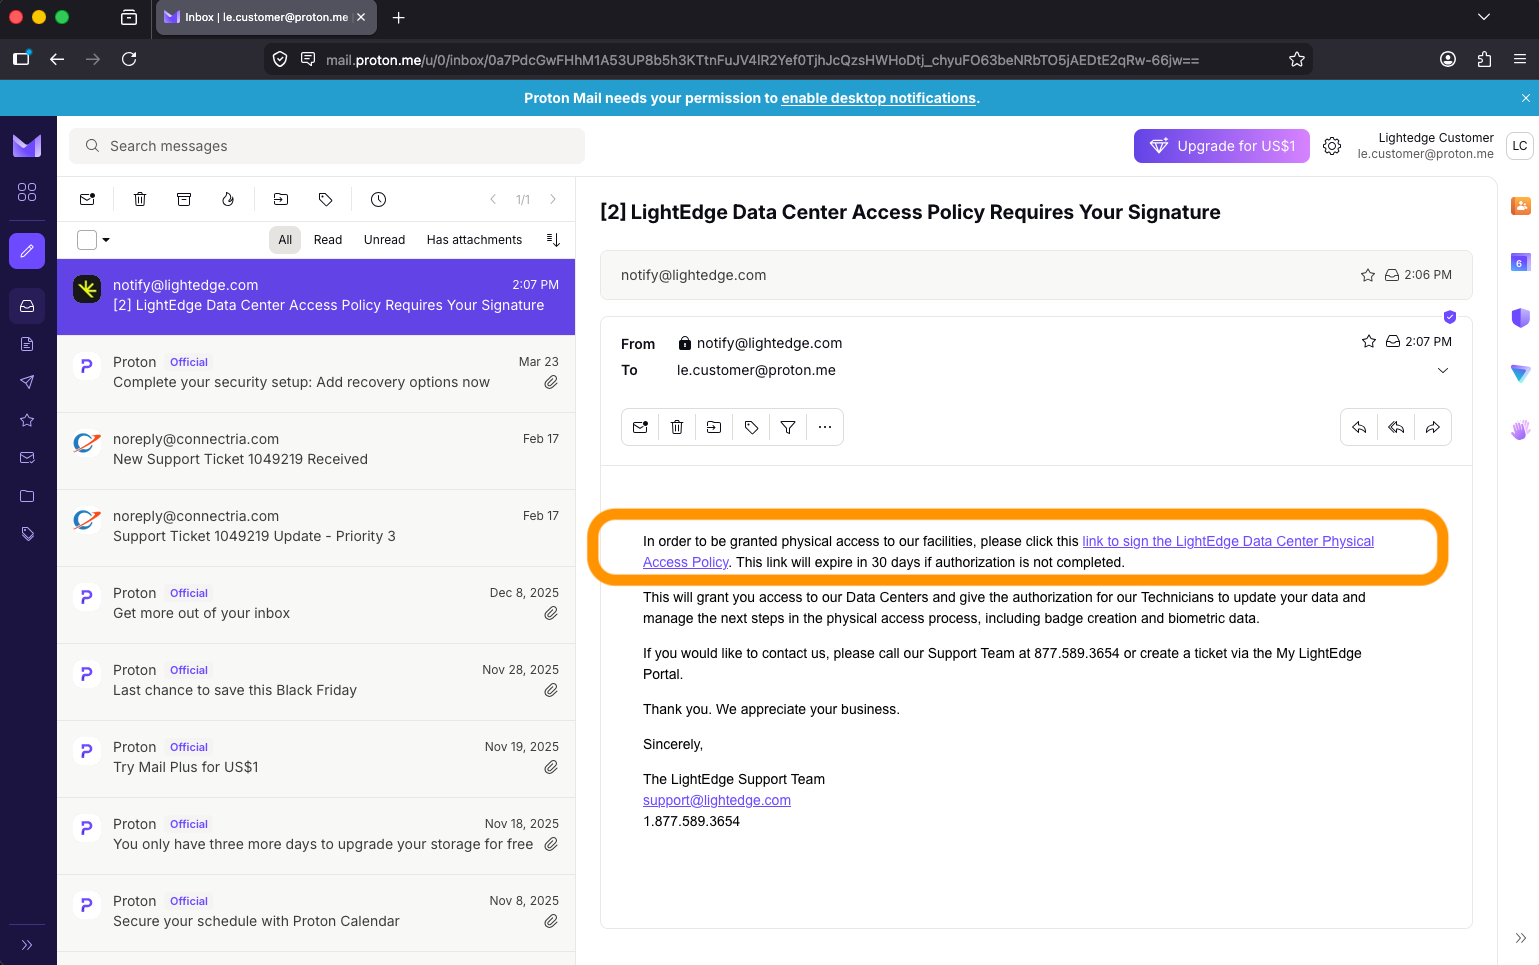
The user who was just granted “Physical Data Center Access (PDCA)” will receive an email from Lightedge with a link to click to sign the Lightedge Data Center Physical Access Policy.
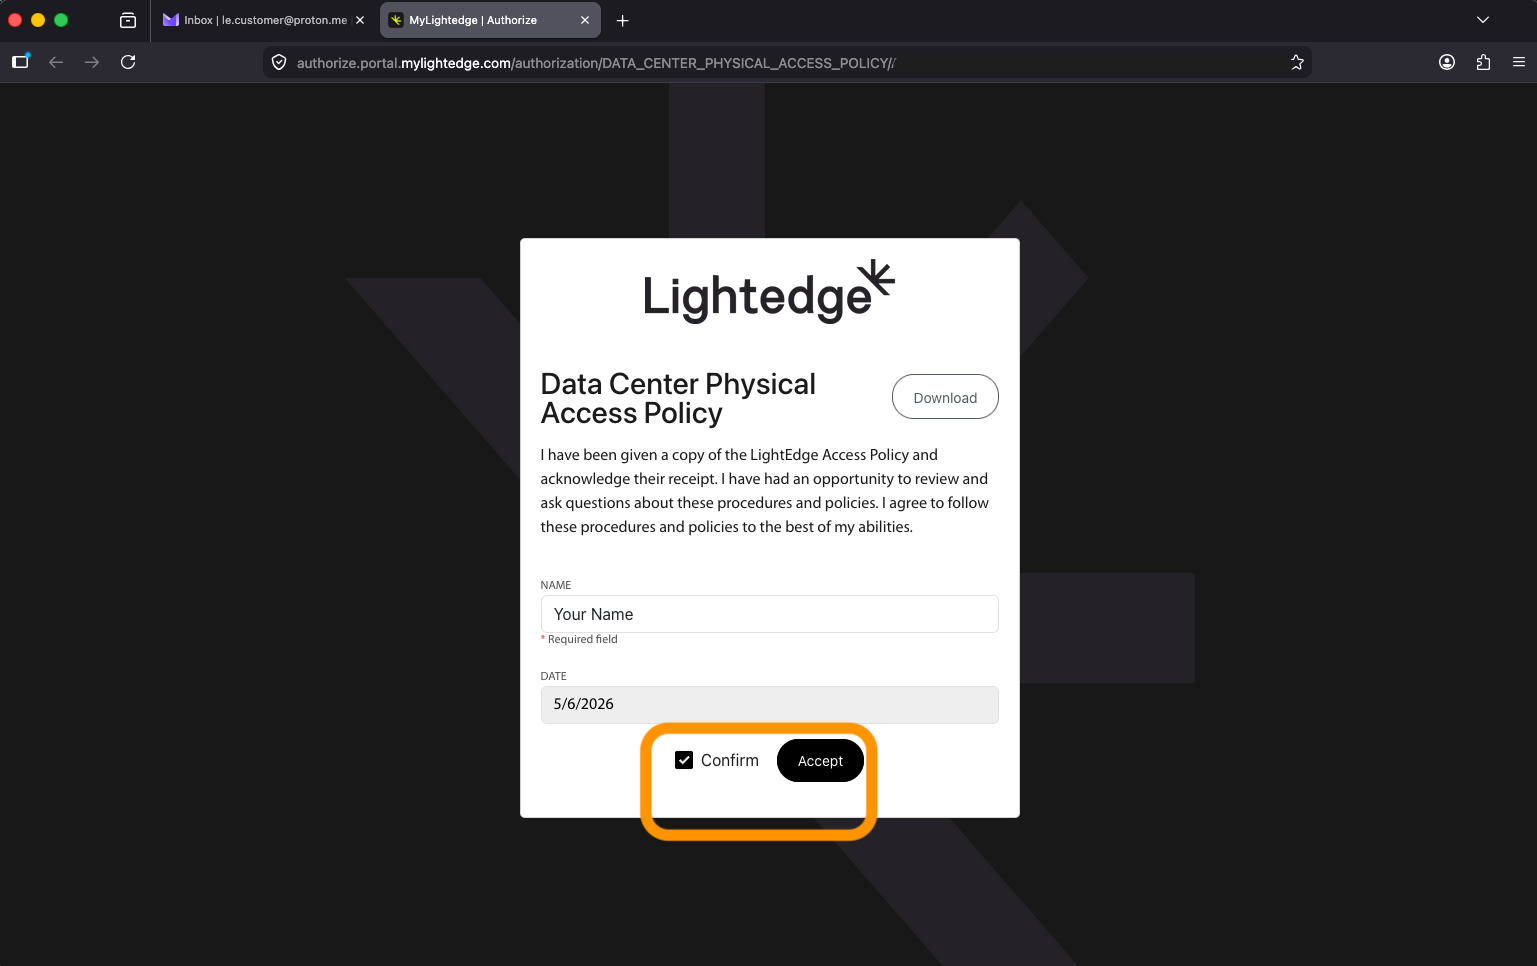
The user must electronically sign this Lightedge Data Center Physical Access Policy, check Confirm, and click Accept. The user may click “Download” to export a copy of the Lightedge Data Center Physical Access Policy.
After e-signing and sumbitting the Lightedge Data Center Physical Access Policy, the user will receive a follow-up email with next steps to follow.